|
Hello, fellow garden enthusiasts and veggie lovers! 🌞🥕
If you've got an abundance of sugar snap peas and want to enjoy their sweet, crisp goodness year-round, freezing them is the perfect solution. Here's how to do it:
Happy freezing! 🌱❄️ Are you ready for the Solar Eclipse? Let's review the safety guidelines and have a little fun with this crossword puzzle. And yes - the answer key is also provide :-)  
Have fun and be safe!
 Hello there! Thanks for stopping by! I thought it was time to catch up on Farm News and give you a sneak peak at what's coming for our 2024 season. First, here is what has been happening this winter. Our very own Farmer Dave had another big surgery. This was not what we were expecting when we closed up for the season. Our winter was spent catching up on medical appointments and staying close to home and staying healthy. All is good and he is looking forward to getting back to farming. Farmer Dave has been taking advantage of our nice weather and working in our high tunnels. Our seed order is here and he is anxious to start some of the early crops. I can't wait to have FRESH vegetables again! I've been working on some new product ideas for the Farm Stand. I'm looking to expand our bread selections and a few other things that I'll let you in on a little later. I think you're going to like them! This season will bring some changes. We will not be offering a CSA this year. We will revisit this idea again in the Fall for next year. Many of you requested additional Farm Stand hours. We heard you and we are adjusting our hours. We will be opening the Farm Stand in April so be sure to follow us here on our website and also on Facebook and Instagram for updates. My focus this year is to help you stock your pantry. There are many reasons to have a stocked pantry - illness, job loss, cost savings, and uncertain world events. It's kind of like having your own insurance policy. Stay tuned - I have lots of resources to share with you! Dave and I are excited to get this year going and are looking forward to seeing our customers again. We are filled with hope for the upcoming season and gratitude for each and every one of you. We will be seeing you soon!  Oh boy - it's been a hot minute since we have had a chance to chat. Grab yourself a beverage and let's catch up.
The Farm - the fields are all tucked in for a nice rest. Farmer Dave completed building our 3rd high tunnel just in time for the change in season. All of our seeds for this year have been received and we are looking forward to warm temperatures and sunshine. CSA (Community Supported Agriculture) - We have a few spots left for our 2023 Summer CSA program. If you have ever wanted to try a CSA out, this is your year. We have shortened our season to 9 weeks for this year only. Our daughter is getting married (yay!) and we are in the throws of wedding plans and felt it best to adjust our CSA length this year. Our CSA will run from July 6th through August 31st and a full share is just $225. Pick up is at our Farm Stand on Thursday afternoons. If you are interested, send me an email here and let's talk about it. Kitchen Shenanigans - In the Winter months, I spend a lot of time canning proteins for my family. Today was Beef Stew with potatoes and onions leftover from last season. These make for quick and easy meals for us to grab during the Summer months when I don't always have a lot of time to cook. AND - I've been working on some new bread recipes using freshly milled grains for the Farm Stand. Muffins, bagels, cinnamon rolls, peanut butter bars, and breads have been rolling out of my kitchen lately. I have been spending loads of time learning about the benefits of milling your own wheat. My family has been putting up with my successes and failures on this journey! More news to come on this new adventure! Thrive Life - In case you missed it, I have become an affiliate with Thrive Life. They offer premium freeze-dried foods. No -- it's not astronaut food! It's real food that has been freeze-dried at the peak of ripeness and preserved to offer an extended shelf life. So you might be wondering why I became an affiliate and didn't just buy a freeze dryer myself. Simply put - when you factor in the time and cost of doing it yourself - it just made more sense to become a consultant. I have a diversified pantry - some store bought, some canned, dehydrated, or frozen, and some freeze-dried. All of these methods save me time and money. So if this is the year that you are ready to build your pantry (and hedge against inflation), check out our Thrive Life on-line store here. It's another great way to support our farm while building your pantry - especially during the Winter months. The Other Stuff - We are in the midst of some big changes (and growing pains) at the Farm. We will share these announcements soon so be sure to watch our Facebook and Instagram pages. It's all GOOD NEWS! In the meantime, I would like to hear from you. What types of activities would you like to see at our Farm Stand this year? Are you interested in learning more about canning, fermenting, dehydrating, or bread making? Or are events like Paint 'n Sip, foraging, medicinal herbs, or cooking classes more your thing. Let me know your thoughts here. Until next time - be of good health! 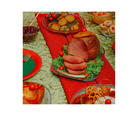 A big "high-five" to all of you that cooked Easter dinner for your friends and family! That was a lot of work and the last thing you want to do this week is to spend another minute in the kitchen.
But .... you've got leftovers in the refrigerator. Specifically that (expensive) ham. Here are 5 ideas to help you use up those leftovers and make your week a little easier:
There you have it. Some ideas to clear out the refrigerator without a lot of effort. I hope this provides some inspiration for you this week and saves you time and money with your leftovers. What ideas for leftovers do you have? Jump on over to our Facebook page and let us know!
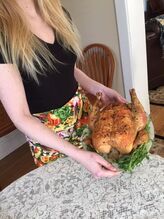
Our Favorite Whole Roasted Chicken Prep time: 15 minutes Cook time: 1 hour 15 minutes Additional time: 15 minutes 5 lb. whole chicken (giblets and neck removed) 2 Tablespoons melted butter 2 teaspoons sea salt 1 teaspoon black pepper 1 teaspoon dried Italian seasoning 1/2 teaspoon garlic powder 1 onion cut into large chunks 2 carrots - peeled and cut into large chunks 2 stalks celery cut into large chunks 1/2 cup water Preheat your oven to 425°F Pat your chicken dry with paper towels. Place the onions, celery, and carrots in the cavity and around the chicken. Place the chicken on a rack or use the vegetables as a rack if you do not have one. Place the chicken in a 9 x 13 pan. Brush entire chicken with melted butter. Combine the sea salt, black pepper, Italian seasoning, and garlic powder in a small bowl. Sprinkle generously over the entire chicken including the cavity. Add water to the bottom of the pan. Roast the chicken for 1 hour and 15 minutes at 425°F or until the internal temperature reaches 165°F . Remove from oven and let the chicken rest for 15 minutes before carving. Notes:
- Roasting two chickens instead of one will save you time and provide you with extra meat that you can freeze for another meal. - This recipe calls for a 5 lb. chicken but will work with a chicken weighing anywhere in the 4.5 - 6.5 lb. range. Just be sure to check the internal temperature and adjust your cooking time accordingly. - Add any aromatics that you have or that are in season. Try rosemary, thyme, parsley or even a cut up lemon. - Avoid cross contamination by having all of your ingredients ready before unwrapping your raw chicken. - Place a foil tent over the breast if it is browning more than you like. - Be sure to save those bones and make delicious bone broth :-) - We prefer to remove all of the meat off of the bones after roasting. Meat can be stored in the refrigerator for up to 5 days and in the freezer for 5 - 6 months. I hope that you found this information helpful and a way to stretch your food dollars and fight inflation.  I don't think I will ever forget the scenes I saw on the news just about a year ago when a storm knocked out part of the Texas power grid. This caught a lot of folks unprepared. I got me to thinking, it was Texas this time, but it could happen anywhere for many different reasons. So today, let's talk a little about how to cook when the lights go out.
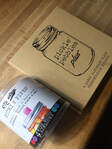
Other ways to cook could include open fire in a firepit, solar oven, rocket stove, and wood stove. Regardless of which one you use, it is best to get a little practice ahead of time. You don't want to wait until the power goes out to start learning! There is nothing quite like being able to provide a hot meal or a cup of coffee (do you have a stovetop percolator?) when the power goes out. It will feed the body as well as smooth some frazzled nerves.  Well it's beginning to feel like Spring at the Farm. Over the past month, there have been a steady stream of deliveries of seeds and supplies. We can safely say that 95% of the seeds for our 2021 crops are safely in hand. We are busy making some changes to the Farm Stand, planning our 2021 Farm events, and wrapping up enrollment for our Summer CSA. It's exhilarating, nerve-racking, and wonderful all at the same time! Come on Spring! The month of February can feel a little dreary as the cold weather hangs on and the cloudy days out-number the sunny ones. So I thought I would share this resource with you on how to make up a weeks worth of salads ahead of time to keep us on track with some of those New Year's resolutions. The title of this resource is "Mason Jar Salad" but really any jar will do. Pints or quarts work the best. What is important is the order of the ingredients. Following the "formula" will help to keep your lettuce and veggies crisp (because who wants soggy lettuce - yuk!!). So starting from the bottom of the jar:
Pack the layers as tight as you wish. Simply shake up the jar and pour out onto a plate and everything will fall into place (or eat right from the jar!). And to make this easier than ever - I made a kitchen guide to help you out. Download it here: 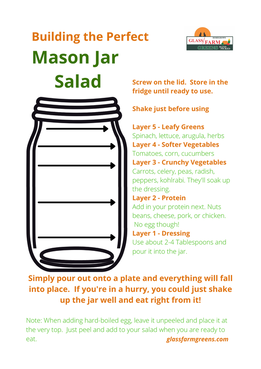
Enjoy my friends! Let these Mason Jar Salads nourish you through the dreary month of February. In the meantime, I hope you all stay safe and healthy. So hopefully you have your turkey in the refrigerator safely thawing by now - that is if you are cooking this Thanksgiving.
On Thursday, when everyone is in food coma after enjoying the delicious meal that you prepared and you are looking at the massive clean up, let me encourage you to save that turkey carcass and turn it into nourishing bone broth. I know, I know - the last thing you want to do is spend anymore time in the kitchen. Fear not, you can place it in a large Ziplock bag and throw it into the freezer for now if need be. However, if you do have the gumption to make some awesome stock, it's a pretty easy process. And, you can use your turkey roaster before you put it away until next year. Here's how: Starting with a clean roaster or crockpot, place the carcass in and add 1/4 cup cider vinegar (optional), 3 - 4 raw carrots (roughly chopped), 3 - 4 celery stalks (roughly chopped), a large onion, a few cloves of garlic, and some spices to taste such as rosemary, oregano, thyme, peppercorns, and salt. In our house, we collect our veggie scraps and place them in a Ziplock bag in the freezer until we are ready to make broth. And here's a tip: onion skins will give your broth that nice brown color. Bone broth is pretty forgiving so you can play around with the ingredients a little. But definitely keep the salt because unsalted bone broth can taste a little blah. Now fill it up with water and set it on a low cook setting (that would be about 200° on a roaster), cover, and let it go to work. Bone broth can cook anywhere from 12 to 36 hours - it is your preference. Note: the amount of water you put in will about equal the amount of broth you will get back. Strain your finished broth through a fine-mesh sieve or cheesecloth. Allow to cool and store in the refrigerator for up to a week. For longer storage, move to the freezer or pressure can. Use your broth to cook pasta or rice, make gravy, as a soup or stew base, add to mashed 'taters, or just to sip on. Yum! The best part of making bone broth is that you made it! You are awesome like that! Happy Thanksgiving from our home to yours. 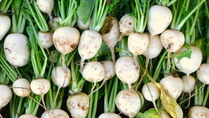 The lowly turnip. It's kind of gotten a bad wrap over the years. I think it is the most overlooked vegetable at the Farm Stand. It's time to elevate it to the top of the list!! The turnip is one of those "two-fer" vegetables meaning that you get two veggies in one. First, there are the greens. These greens are packed with vitamins K, A, C, and B-complex. They are very versatile. They can be added to salads, stir-fries, or sauted with a little olive oil. Use it as you would spinach or other leafy greens. Then there is the root. Raw - they are a great addition to a veggie platter when cut into matchsticks. You can also boil, steam, or roast them (see my Balsamic Roasted Turnip recipe below). The turnip root is high in Vitamin C and we can all use a little extra of that! When you bring your turnips home, it is important to remove the greens before you put them in the refrigerator. Store the greens by wrapping them in a damp paper towel or put them into a plastic bag. Place them in the crisper drawer of your refrigerator. When your ready to use them, give them a quick rinse and shake off the excess water. If you have a salad spinner, this is an excellent time to use it. For the root, trim off the top and the tail. Remove any dirt with your veggie scrubber or brush and store just like any other root vegetable in your refrigerator. Turnips do not need to be peeled - just remove any damaged areas before storing. Turnips are usually available in the Spring and Fall when the growing temperatures are on the cooler side. So the next time you are at the Farm Stand, give turnips a try. Here is an easy recipe to get you started: Balsamic Roasted Turnips 1. Preheat oven to 450°. Cut the tops and bottoms from your turnips and discard. Cut them into 1 inch pieces and add them to a medium size bowl. Set aside.
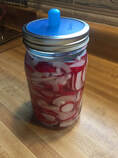
2. In a small bowl, whisk your olive oil, 1 Tablespoon balsamic vinegar, thyme, salt, and pepper. Pour it over the turnips and toss to coat. 3. Spread the turnips in a single layer on a greased baking sheet and cook for 15 minutes. Stir and cook for 10 more minutes. 4. Remove from oven and place in a serving bowl. Stir in the snipped parsley and a light drizzle of balsamic vinegar. Add a bit more salt and pepper if desired and serve. Makes 4 servings 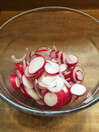 I think that we all can agree that a healthy immune system is pretty important these days! I have an amazing tip for you that not only will help you use your summertime fresh veggies but will give your immune system a boost. And you can put it together in less than 15 minutes. Fermentation is a time-honored technique of preserving food. According to healthline.com, fermentation promotes the growth of beneficial bacteria (probiotics) which have been shown to improve immune function as well as digestive and heart health. All good stuff - wouldn't you agree?! So let's start with something pretty easy - radishes. The first rule with any fermentation is to start with clean, fresh food and clean tools. In this picture , I have sliced about two bunches of radishes and one small onion. You can add garlic, herbs, or red pepper flakes - wherever your taste buds lead you. Give them a quick toss to combine. Pack them into a clean jar. I usually use a quart size mason jar with a wide mouth. Pack it tight right up to the neck of the jar. Next dissolve 2 teaspoons of non-iodized salt in 2 cups of lukewarm filtered water. Pink Himalayan or sea salt work well here. Pour your brine over your radish mix. You will need enough liquid to completely cover those veggies. Your next step is to weigh down your veggies to keep them submerged underneath the brine solution. In this picture, you will see that I am using a pickle pebble. This is a piece of glass that looks like a hockey puck. If you don't have one, try using a 4 ounce mason jar. Again, the goal is to keep the veggies submerged underneath the water line.  Wipe off the rim of your jar and cap it. I use a pickle pipe that allows any built up gases to automatically release without allowing air back in. You can use a mason jar lid or plastic cap if you don't have a pickle pipe. Just be sure to "burp" your jar a couple of time a day to avoid pressure building up. Let it sit on your kitchen counter for about 5 days. It is normal for the water to turn a little cloudy as the ferment ages. Taste it on day 5. If it is not tangy enough, let is sit a few more days. When it is just right, remove the weight and the pickle pipe, cap your jar and place it in the refrigerator. Use your fermented radishes on tossed salads, mixed into pasta salads, or as a topping for your favorite burger or sandwich. Rarely, things can go wrong when fermenting. Here's what to look for to detect a bad ferment: - if you see any type of mold forming for if it just smells "off" -- use the rule "when in doubt, throw it out". - a ferment will go bad if it is exposed to air, the salt ratio is wrong, if the vegetables or tools aren't clean, or if you use chlorinated water. Follow the rules and you will do just fine! Fermenting has been around for a long time and is generally safe. This recipe goes together in less than 15 minutes. The veggie combinations are endless and the health benefits are unbeatable. I challenge you to ferment for health this summer!
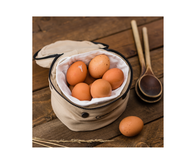 Full disclosure - we do not have chickens on our farm - yet (darn!). However, my farmer friend - Sheila - does and we got together this week for a good gal to gal farm talk. During our conversation, she told me that her chickens are starting to lay more eggs now that Spring is coming. She offered me a couple of dozen -- I felt like I won the lottery! So maybe you are like me - you don't always have access to farm fresh eggs so you end up settling and grabbing some at the grocery store. Yep - I've been there and done that. Those eggs just aren't the same as local fresh eggs. What if I could show you three easy ways to use a dozen eggs? Would you maybe buy an extra dozen the next time you visit your local farmer or farmer's market? What if I could save you time and show you how you can have easier access to those delicious eggs? Interested? I am passionate about teaching you how to return to real food. I've put together a free guide with recipes that will make it a breeze to stash a dozen eggs away to feed your family or to use for baking. Spoiler alert - one of the recipes uses your instant pot :-) Grab your free copy here: 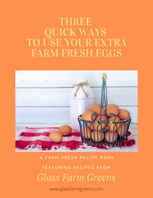 P.S. If you want to learn more about getting farm fresh food on your table quick and easy, we invite you to be a part of the Glass Farm Greens Family. Just head over to our Contact Page (upper right corner) and join our growing email list of folks just like you who are the first to be notified of what's in season at the farm, our class schedule, and endless recipes ideas.
This past weekend we had the pleasure of visiting with the great grandchildren of the family who established our farm. The Guttschow Farm was settled in the 1800's and was largely a dairy operation. Our guests - Kristine, Laurie, Diane, Don, and Dan shared with us what it was like growing up on this homestead. We learned as children they watched for the school bus from the upstairs window. They shared that they raised chickens and how family and friends all participated on butchering day. We learned that they had a large garden and they canned their own food which was stored in the cellar. They played with grasshoppers and looked for mice among the corn. There was joy and laughter and music from a piano that entered the house through the second story window. The laundry was hung on the line to dry. There was a smokehouse, a treehouse, and an outhouse. There were births and deaths, hard work, and sacrifices. They talked about gathering around the dining room table sharing meals or a cup of coffee with all who visited. You see - everyone loved coming out to the farm. There was a feeling of family and community here. Their mother and grandmother had the gift of hospitality and knew just how to make any visitor feel right at home. This -- this feeling of family and community. This gift of hospitality. This is our dream -- our goal. To bring this feeling full circle at the Farm. I can't help but feel a connection to the women of this homestead that went before me. The busyness of the kitchen, the aroma of fresh coffee, the joy of planting a garden that provided for the family. I am in awe and humbled to step into that role. To Kristine, Laurie, Diane, Don, and Dan -- we owe you a debt of gratitude. Sharing your stories with us strengthened the fabric of this farm. We hope that your visits here with be frequent. 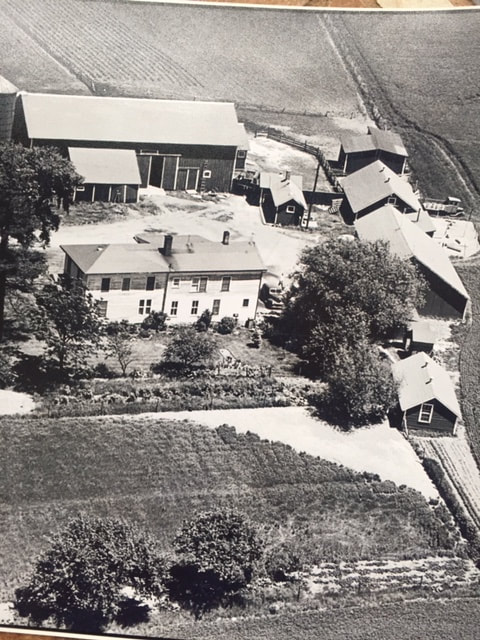 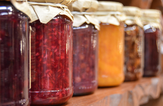 When I talk to customers about canning their food usually one of two things happen. They either: a) are already doing it and are eager to share a story about their latest project; or b) they have never done it but want to learn. So I asked those in the second group what's keeping them from getting started from learning how to can their food at home. Their answers varied but the #1 reason was the fear that they would accidentally poison their family. Their concern is valid - food poisoning and botulism are very real things. And, I'm glad that they take it seriously. However, done properly, home canning can be done safely and can provide you with nutritious food all year long. What exactly is botulism? It is a toxin that thrives in room temperature, oxygen deprived, moist conditions. It goes way beyond a stomach ache and can be fatal. You may be thinking - why even take the risk? For me and my family, it comes down to trust. When I can food for my family, I pick from the best fruits and vegetables, follow strict cleanliness rules, and stick to the rules for safe canning. This food gets my personal attention - it hasn't been handled by multiple people in a large facility. Home canning can be done safely by following a few simple rules: 1) Use approved and tested recipes for your canning projects. That means recipes from your local State Extension Office, the National Center for Home Food Preservation, or any of the Ball® canning resources. Never adjust a recipe, the pounds of pressure, or the processing time. 2) Low acid foods must be pressure canned. Examples of low acid foods are vegetables and meat. Botulism spores cannot survive in temperatures over 240°F. Pressure canning brings the temperature high enough to kill off any botulism spores. 3) Water bath canning is used for high acid foods only. Examples of high acid foods are pickles, jams, and most fruits. Often acid is added in the recipe to bring the food up to a safe level. Common acids used include vinegar and lemon juice. The vinegar must be labeled at 5% acidity and use only bottled lemon juice since the acidity of fresh lemons can vary between varieties. Test the acid level of the recipe before canning using pH test strips to ensure that the pH is 4.6 or lower. 4) Most importantly - curb your creativity when canning. Altering a recipe can make your food unsafe. If canning is something that you've always wanted to do but have been afraid or unsure of where to begin, we're here to help. We will be holding canning and food preservation workshops at the Farm Stand this year and invite you to join us. Be sure that you have signed up for our emails so you can be notified of the upcoming workshop schedules. Bon Apetit! The week before Christmas -- are you feeling a little frazzled, worn-out, stressed? Our days is filled with a long to-do list with very little time for self-care.
It's time for a change. Come along with me (and my Danish roots) and embrace the hygge life this winter. So what is hygge? I'm glad you asked. First things first - it is pronounced "hoo-ga". This Danish word is not easily translated. It is better defined as the concept of feeling "cozy contentment and well-being by enjoying the simpler things in life". Maybe it is making the time to read a good book, or enjoying a warm cup of tea or cocoa, and just lighting a few candles at night to give your home that warm glow. Did you know that Denmark is known to be the land of happiness? My Danish heritage comes from my mother's side of the family. She perfected the hygge life. She made sure the guests in our home were comfortable, always fed, and she always had time for warm conversation. This was especially evident during the holidays when the mood in our home was light and joyful - never hectic or hurried. So here are a few ideas for you to put a little more hygge (Danish happiness) in your life and practice a little self-care during the holidays. - Go for a walk. Breathe the fresh air. Take notice of nature. - Get something warm to drink. Tea, coffee, hot cocoa - dress it up with honey, whipped cream, or marshmallows. - Take a break from social media and watch the sunrise or sunset. - Read a good book, learn to do a craft, play a board game with friends or family. Let's be intentional this holiday season about slowing down and relaxing and practicing a little bit of self-care. It's a difficult world out there so take a few deep breaths and hit the reset button. May joy and happiness be your best gift this year. I admit - I gave in to a moment of weakness.
Yesterday I was cruising through my local multi-offering box store picking up a few things for Thanksgiving. I came upon a display of brown 'n serve dinner rolls that were priced at just a mere $1.00. I hesitated and before I knew it they were in my cart. All I was thinking was it's just a dollar and it will save me time on Thanksgiving. I reasoned with myself that it was okay since everything else on our table was going to be homemade. Can you relate? It wasn't until I got them home and turned the package over that I noticed that there was a warning label on them. A WARNING label - y'all - on my dinner rolls! Yep - there it was - "Consuming this product can expose you to chemicals including acrylamide, which are known to the state of California to cause cancer ….." Ughhh! I starting doing a little digging on acrylamide. Turns out that we have likely been consuming this all along without realizing it. According to the FDA website (fda.gov), acrylamide forms from sugars and an amino acid during certain types of high-temperature cooking, such as frying, roasting, and baking. The sugars and amino acid are naturally present in food - such as potato products (think French fries), grain products, or coffee. It goes on to say that since it is formed through cooking, it doesn't matter if the food is organic or not. So what's a gal to do. Well, the dinner rolls won't be making an appearance on the dinner table. Not necessarily because of the warning label, but because of the three inch list of ingredients next to it with a whole bunch of words that I can't pronounce. And for the future, just like you, I'll continue to do the best that I can. It may not be perfect but each good decision is one less bad one. My wish for you this Thanksgiving is that you are surrounded by good food, good thoughts, and good people. Happy Thanksgiving! So I just read a statistic from one of my favorite bloggers that said the average American eats out 5.9 times per week. Oh my goodness ….. that has to affect not only our health but also our wallets. While I enjoy a meal out every now and then, it has always been a "treat" and not part of our routine. It's just too darn expensive! I say it's time to take up our aprons and revolt --- it's time to return to the kitchen! Cooking can be fun and convenient with a little planning ahead of time. For our house, this happens on Sunday morning. I sit down with my calendar, review our appointments and activities, and pencil in our dinners for the week. I take a quick inventory of the refrigerator, freezer and pantry and add any missing ingredients to my shopping list that I keep on my phone. I have to tell you - this is freeing! No more stress about "what's for dinner" at the last minute or trying to defrost something quickly. No more calling the pizza place (again) because the day got away from you. You have a plan! To give you some inspiration, I've put together some quick and easy meal and dessert ideas in our "Favorite Fall Recipes" book. Snag your free copy here: Oh, any by the way …. we put some of that summer goodness away for you and even did some of the prep work to make your meal planning even easier. In our Field to Freezer section of our Farm Stand, you will find;
Green Beans Whole Green Peppers - cleaned and ready for your favorite stuffing Pepper Packs - sliced with onions and ready for fajitas, stir fry, pepper steak, . . . . Diced green pepper and onion - perfect for meatloaf, meatballs, potatoes obrien, omelets, . . . . Sliced green peppers and tomatoes - can you say pizza night!!! Shredded zucchini and shredded yellow summer squash - ready for your favorite bread recipe Stop by the Farm Stand and pick up a little inspiration and let's get cooking! Welcome November - we're glad you're here - sort of. It seems like I have been living in my kitchen for the last 6 weeks. Canning, freezing, dehydrating - you name it - it's been happening here. The good news is that there is a light at the end of the tunnel and preserving the harvest is almost done. Our surprise snowstorm yesterday really put a period at the end of that sentence. I don't know about you but I'm still craving everything pumpkin. I know, I know - some of you are sick of it already but I promise that these pumpkin pancakes are easy and will be a hit with your family. And the best part is that they can be made ahead of time and popped into the freezer for a quick breakfast. Pumpkin Pancakes 1 cup pumpkin puree 2 eggs 5 tsp. baking powder 1 tsp. cinnamon 1/4 tsp. cloves 2 cups flour 1/4 tsp. nutmeg 1 tsp. salt 1/3 cup sugar 1 tsp. vanilla 1/2 cup oil 1 1/2 cups milk Mix your dry ingredients: in a large bowl, mix together the flour, sugar, nutmeg salt, baking powder, cloves and cinnamon. Mix your wet ingredients: Using a smaller bowl, whisk together the milk, oil, eggs, vanilla, and pumpkin puree until fully blended. Combine: Pour the wet ingredients into the bowl with the flour mixture and then stir until everything has combined. Let the batter rest for 5 - 10 minutes. Cook: Get your skillet or griddle to about medium heat. Pour about 1/3 cup pancake batter onto the griddle and cook each side for about 3 - 4 minutes. Flip when you see there are large bubbles forming in the batter. Top with maple syrup (the real stuff!) or whipped cream. Freeze: Leftover pancakes can be frozen. Place in a single layer with waxed paper or parchment paper between layers and freeze in an airtight container. Pull individual pancakes out when needed and heat in the microwave. I hope that you will find this recipe quick and easy. As the holidays approach, quick and easy is the name of the game between now and the end of the year!
And a quick farm update - a HUGE thank you to everyone who has come out and visited us at the Farm Stand. We've enjoyed connecting with you and we are looking forward many more conversations. The Farm Stand is open with limited hours as we enter into the winter season. If you need something, don't hesitate to reach out to us. Our "Field to Frozen" freezer has our vegetables safely tucked away for you so that you can enjoy local produce throughout the year. And - we've got those jams, pickles, honey, and salsa too! See you soon! 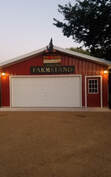 Whew! We did it! We opened up the Farm Stand yesterday and we had a ball! So many of you stopped out to say hello and to check out our new digs and we can't thank you enough. We so enjoyed the opportunity to visit with you. We are blessed with good family and friends that helped us along the way. Thank you - we could have never done it without you. To our Farmer's Market customers - a warm thank you for your support and encouragement this summer. We always looked forward to our Friday nights in Marengo and Saturday mornings in Huntley because we got to see you - our friends. Going forward - our Farm Stand will be open Friday from 1:00 - 6:00, Saturday from 11:00 - 5:00; and Sunday from 11:00 - 3:00 during the month of October. We anticipate that we will remain open with reduced hours for November and beyond. We've put lots of goodies away for you to enjoy this winter and have a few surprises in store as well. Of course, we will update this website and our Social Media outlets with any changes. You will also find us at the Huntley Indoor Market the first Saturday of each month at the American Legion Hall from 9:00 - 1:00 from November - May. Once again, thank you for being a part of our farm. See you soon!
Heading to the apple orchard is a favorite Fall pastime for most us in these parts.
We have many orchards around us so we make at least one trip a year. And, if you're lucky, not only will you be bringing home some delicious apples, but you will be toting a bag of warm apple cider donuts as well. I bet you can smell the cinnamon sugar right now - can't you?!?! So - what to do with all of those apples. How about an easy apple pie filling that you can put into the freezer now and pull out say around Thanksgiving. Did I mention that it is EASY? Here's what to do: for each 9-inch pie you will need - 3 cups peeled and sliced apples (about 3 to 4 medium apples - I find mixing tart and sweet apples together give the best flavor) 1 Tablespoon flour 1/3 cup sugar 1/2 teaspoon cinnamon 1/4 teaspoon nutmeg a couple of pats of butter Mix all of the ingredients together except for the butter. Pour into a quart size freezer bag (or use your vacuum sealer). Add the pats of butter and seal up - removing as much air as possible. Now put that gem in your freezer. Easy - right! When you're ready for pie, remove the filling and thaw overnight in the refrigerator. Place your pie crust in your baking dish - homemade or store-bought (no judgement here - I've done both!) and dust the bottom crust with just a little bit of flour. Add your filling and top with your second pie crust. Crimp the edges and cut slits in the top to allow the steam to escape. Brush the top crust with a little bit of milk and dust with a bit of sugar. Bake in a preheated 400 degree oven for about 50 minutes. And voila - you have pie. I hope you try and enjoy this. Now it's your turn - what is your favorite apple recipe? Okay - so this is the time of year that zucchini mysteriously shows up on your doorstep. Your well-meaning neighbor zealously planted a few extra plants this spring and they became overachievers.
Or, you grow your own and turned your back on those buggers and now they are the size of baseball bats. Hey, it happens! Well, I've got a few tips on how you can preserve those beauties and have ooo-la-la wonderful zucchini bread this winter. Buckle up 'cause here we go: - always give your produce a good bath when it comes into the house - because there's no dirt allowed at freezer camp (which is where they will be staying) - trim off both ends and discard them. Now, if your zucchini is large, you may want to cut it in half and remove the seeds. Totally optional. - Time to get grating. If you have a food processor, get it out - your arms will thank you later. - Here is where I let you in on a few of my secrets. You're going to want to save this in two cup portions because that is what most bread recipes call for. Place a zipper type sandwich bag in your 2 cup measuring cup and filler' up. When you've got your two cups, lay that bag on the counter and squeeze out as much air as possible and seal. - Now that sandwich bag is not enough protection for those goodies to go into the freezer. If you have a vacuum sealer (like a Foodsaver), slip that sandwich bag into a foodsaver bag and seal it up. By the way, this double bag trick works with most moist foods that give you trouble with getting a good seal. If you don't have a vacuum sealer system, a quart sized freezer bag will do the trick. - Label your bag and send it to freezer camp. - Fast-forward to January - it's cold and snowy and you're thinking that the warm flavors of zucchini bread would be pretty nice with a cup of tea or coffee. Pull out one of those gems from the freezer and thaw. - You will notice that your thawed zucchini gave you a lot of extra liquid. Carefully remove the sandwich bag from your freezer bag making sure that your sandwich bag is zippered up nice and tight. Using a sharp knife, pierce a few holes in one side of the sandwich bag. Gently squeeze out the extra liquid and now you are ready to use it in your favorite recipe. By the way, grated zucchini can be used in more than just bread. Here's a recipe to get you thinking "out of the box": Zucchini and Egg Breakfast Burrito 1 slice bacon - diced 1/4 cup shredded zucchini 1 Tablespoon red bell pepper, diced 1/4 teaspoon salt 2 Tablespoons shredded cheddar cheese 1 6 inch tortilla - In a medium skillet over medium heat, cook the bacon until crisp. Add the zucchini, red pepper, ad salt and cook until it begins to brown. Add your eggs and cook until desired consistency. - Lay the zucchini/egg mixture in your tortilla and top with cheese. Roll up burrito style and enjoy with your favorite hot sauce or salsa. Now it's your turn. What is your favorite zucchini recipe? Comment below and share it with us! Bon Appetit! Jenny Merry Christmas!!
Listen, do you hear that? Yep - it's Christmas carols playing in the background. Welcome to Christmas in July. Okay - so you may be saying "Bah! Humbug!" right about now because it wasn't so long ago that we chased the cold temperatures away. However, in less than 90 days, our homes will be filled with fall colors and flavors and that means we are on the express train to the holidays. So as our daylight gets shorter and our outside temperatures start downward once again, it's time to make some preparations. In our house, there is a fair amount of baking that goes on in the fall and winter. Today I wanted to share with you my recipe for homemade vanilla extract. If you've noticed, the price of real vanilla has skyrocketed in the stores and I won't even think about using the imitation stuff. It's much more economical to make your own but it does take a little planning ahead of time. It will need to sit for about six weeks before it is ready to use. This recipe does use alcohol - however - the alcohol evaporates during baking. The alcohol also prevents most bacteria from growing and is necessary to extract the flavor from the vanilla beans. Homemade Vanilla Extract What you'll need: 7 - 10 vanilla beans 8 ounces vodka or white rum (going cheap here is A-OK!) What to do: Using a sharp knife, run a slit lengthwise down the vanilla bean to open it up. Cut the vanilla beans in 1-inch pieces and place in a pint sized mason jar. Pour the alcohol over the beans making sure that they are completely covered. Place the lid on the jar and gently shake. Place your jar in a cool, dark area. Give it a shake every 2 - 3 days for about six weeks. The longer you let it steep, the more intense the flavor will be. Once your extract has reached its desired strength, strain out the beans using a mesh strainer and store in a clean bottle with a tight fitting lid. Easy right?!?! This makes a great gift so make an extra batch for a friend (you'll be immediately moved to best friend ever status!) Now that I have you thinking about Christmas, please tell me - what homemade gifts to you give during the holidays? Comment below and share your ideas with our community. It will be fun and inspirational to see what everyone does. And - if you found this post to be helpful, please pass it on to your friends! xoxo, Jenny Is it just me or does it feel like we just haven't gotten summer started yet?
We get a couple of nice days and then - bam! - more rain. And not just a little rain - a lot of rain. So this week we celebrate the 4th of July and typically, that signals that summer is half over. You've heard the saying "knee high by 4th of July" for measuring sweet corn? It's a bit of a stretch this year. Nonetheless, the Independence Day celebrations must go on! There will be fireworks and picnics with loads of good food. The strawberries will definitely be there and I would like to share a recipe with you for Strawberry Rhubarb Dump Cake. It's super easy and doesn't dirty a lot of dishes - cuz' who has time for that! I wish I could take credit for this recipe but it belongs to Melissa K. Norris. She is an author/blogger/podcaster/and homesteader extraordinaire. If your looking to get back to a simpler lifestyle -she's your gal. She's written two books that focus on homesteading ways - The Made from Scratch Life and Handmade - The Modern Guide to Made from Scratch Living. I highly recommend them both for your summer reading list. Here's her recipe: Strawberry Rhubarb Dump Cake without Jello Ingredients 4 cups diced rhubarb 1 and 1/2 cups sliced strawberries 1/4 to 1/2 cup sugar 1 scoop (2 and 1/2 teaspoons) gelatin 1 cup cold water Homemade cake mix (below) 1 and 1/2 cups all purpose flour 3 Tablespoons organic non-GMO corn starch 3/4 cup sugar 1 teaspoon baking powder 1/2 teaspoon salt Instructions 1. Preheat oven to 350 degrees Fahrenheit. Place rhubarb and sliced strawberries in pan, sprinkle sugar over it, then evenly sprinkle gelatin over top. 2. Thoroughly mix your dry cake ingredients together and sprinkle evenly over rhubarb. Pour your 1 cup water over all of this and dot with 3 tablespoons chopped butter. Don't stir! 3. Bake at 350 for 1 hour. Serve this warm by itself, or add a dollop of whipped cream or vanilla ice cream. Enjoy and Happy 4th of July! If you try this recipe, drop me a note and let me know how you liked it. See you soon! Easter is upon us and many will be preparing a meal for a gathering of family and friends.
If you are planning to have ham as part of your meal, I invite you to try the recipe below. It is easy and is sure to impress. Ham with Pepper Jelly Glaze 15 - 18 lb. bone-in or boneless whole fully cooked ham 1 T. olive oil 1 t. freshly ground pepper 2 cups white wine 2 T. whole peppercorns 1 T. whole cloves 2 bay leaves 4 cups water 6 cups ginger ale 1/2 cup Glass Farm Greens Pepper Jelly 1 T. Dijon mustard Preheat oven to 350°. Score the surface of the ham in a diamond pattern 1/8" deep. Place ham in a large roasting pan with a rack. Pour olive oil in bottom of pan. Pour wine into bottom of pan; stir in peppercorns, cloves, and bay leaves. Add 4 cups of water. Tent it with foil and bake for 2 - 2 1/2 hours (per package instructions). While ham is baking, bring ginger ale to a boil in a skillet over medium-high heat. Boil until reduced to 3/4 cup (about 25 - 30 minutes.) Remove from heat and stir in pepper jelly and mustard until smooth. Remove foil from ham and brush the glaze all over the ham. Return ham to oven for the remaining baking time (per package instructions). Repeat baste every 20 minutes. Allow ham to cool 15 - 20 minutes before carving. Enjoy! Happy April Fools Day - well almost! Did you grow up in a household that played pranks on April 1st? Well, I did and my mom was the mastermind of them all. We teamed up against my three older brothers and made a day of it. We short-sheeted the beds, put sugar in the salt shaker, reset alarm clocks, and put Vaseline on doorknobs. But my favorite prank was a report I turned into my teacher in grade school (now that was bold!). My Aunt Luella helped me with this one. If I had to use only one word to describe her, it would be "kind". She was the oldest of my mother's siblings and she made you feel as if you were the most important person in her world when you were with her. She owned the Montgomery Ward catalog store in town and my husband and I had the privilege of living next door to her when we were first married. So in honor of her memory, here's her recipe for -- Elephant Stew 1 Elephant Brown Gravy Salt & Pepper 2 rabbits (optional) - Cut elephant into bite-size pieces. This should take about two months. - Cover with brown gravy - Cook over a kerosene fire for about four weeks at 465° - This will serve 3800 people. If more are expected, two rabbits may be added but do this only if necessary as most people do not like to find "hare" in their stew. Let your inner prankster out on April 1st and have a little fun. Share this recipe with your friends and invite them over for a little Elephant Stew! *
|
||||||||||||